Thursday 31 December 2015

48/52 Texture Testing = More Joyfulness


I'm very excited about the new textures I'm working on!!

We have been doing testing on the production of them and we seem to have it sussed now. YAY!!
These are very different to the laser cut card Joyful textures that I already sell. These are new designs and a different material for the texture plates. They are durable and produce really sharp details as you can see from the photos. 
I can't show you an actual texture plate just yet - trade secrets and all that you know ;) lol

The earrings above are combined with various semi precious beads - sleeping beauty turquoise, imperial topaz, carnelian and amethyst. (These are all for sale so I must get on and list them!) The black beads in the photo below are tourmaline. 


Next I'll make some enamelled examples :D
I should have these for sale in January, I'm still finishing off all the designs. If you want me to let you know when they are ready just let me know.
I do hope you like them!

Have fun!

Joy x

47/52 Joyful Torii Part 2


Back in September I made this Torii pendant as part of my challenge. You can read all about how I made it in 31/52 Joyful Torii Part 1

This is the back of the pendant.


Now for Joyful Torii Part 2!!!


The plan was to try using some glass Filato that I bought in Murano, Venice years and years ago. I always wanted to try doing a bit of micro mosaic, but of course having bought these, there they sat, unused!!! Filato are made from Smalti glass and are long rods that are only 1-2mm wide.  

I've never tried anything like this before - so I will say straight off that I was winging it as I went along!! :D It largely depended on some internet research and a bit of trial and error ;)


First was cutting up the rods into small bits for the pattern. I wanted to stay with something really simple...so I just went with some coloured stripes. I used some sticky stuff on paper so I could work out the design, you can see the pieces being put together on the left in the above photo. 


 Next job was to start gluing all the pieces into the frame. If you've read Part 1 you'll know I wasn't too sure about the overall shape of the frame. As you can see from the photos I went with taking off the two lower side pieces.I like this shape better.

I had already realised that I should of made the frame deeper before I ever got this far, but what the heck, I was going for it anyway :)  I knew it would mean I couldn't really go for the mosaic surface being flush with the frame, but it was all a learning process!!


My cutting of the pieces was quite an inexact science so the top surface wasn't very even, but at least they all fitted in!!


I let the glue cure and then started to file the surface off to make it more even.


The glass filed down quite easily.

Finally I sealed the top surface. The plan here was to use Lisa Pavela's Magic Gloss to give a nice shiny raised finish...however that idea went out the window when I found the new bottle had gone off and set solid :( Apparently it has a shelf life and I'd had mine for years!! 

So instead I just sealed the surface with more Weldbond. Not ideal and I'll probably redo it in time. Anyway here is the finished piece on a chain with a few complementary beads!


It is far from perfect but I learnt loads doing it. I know I need to cut pieces to a much more even size and shape, I probably need to find a different glue, I need to make frames deeper etc etc...but mainly I learnt...I liked doing it!!!

So this is another technique I'll have another go at in the future to see if I can make something much better :D

Have fun!

Joy x

Tuesday 29 December 2015

46/52 Japanese Mask


As I'm sure you know I've made masks pendants for quite a while now. Most of my masks are based on Venetian ones, but I've also made an assortment of animals and aliens!

When I was in Japan I saw lots of festival masks and decided I really should try to make a Japanese style mask! I was just taking a photo of them in this shop window when Dice Minagawa did his impression of one as well! ;)


That kind of made up my mind which style to try! I think this comic mask face is whistling and is called Usofuki from Kyogen traditional comic theatre (but of course I might be wrong!!) :)

I started out using my own mask mould, the same one I use for all my masks. This mould has the eyes cut out though and for this mask I wanted to add eyes (a first for me!!). I decided to fill the eye holes with more Art Clay silver and then set about building up the cheeks and nose to make the comic face. This is a work in progress photo. At this point I was still creating the shape and just trying out how the eyes might look with some dry scraps of clay. 


Once I was happy with the face I finished the back (more on that in a moment) and then fired the piece. Here it is after a quick polishing.


Next was enamelling. A little red in the mouth, some white and yellow for the eyes and black for the eyebrows and nostrils. The dark around the eyes is from a patina I added after enamelling, which I then polished back when I added a stain finish to the mask.


As well as having eyes the other difference for this mask is that I decided to make it into a brooch. Another first for me!! :D

I added a tube and a hook, both made of of silver clay, before I fired the mask. The very last job I did was to add a length of hardened sterling silver wire for the pin.


I've tried wearing it and it sits quite nicely! 


It was a fun brooch to make and something different for me...which has gotten me thinking a lot more about some new styles of masks!!!

That's something to watch out for in 2016!

Have fun!

Joy x

Monday 28 December 2015

45/52 Joyful Parrot Fob


I couldn't post this one before Christmas as it was a present! :D

It is made in fine silver and about 4cm high. The colour is all enamel. It is a fob...designed to be attached to a pocket watch chain, hence the style of clasp on it. 


It's double sided and both sides are enamelled so it doesn't matter if it turns while it is being worn. 

It's quite thick to make it nice and strong.


I've been promising to make this piece for several years! Somehow each time I tried to start it I just couldn't come up with a design or style that I liked.

Parrots are very special in our family (my maiden name is Parrott ;) ), so any old parrot just wouldn't do - it had to be right!! It also had to be very bright and colourful (of course!)!! This is based on a macaw.


This year I've been making a lot more enamelled pieces in this sort of style and when I thought about it I realised, at last, it was perfect way to make the parrot. 


 I now have one very happy brother ;)


Have fun!

Joy x 


Thursday 10 December 2015

44/59 A Bag of Bling!


I buy quite a few stone from a UK company called Diamond CZ. Recently they had a charity auction on eBay that I was delighted to win. It is a variety of mixed stones, some have minor flaws which I was expecting, a lot are very usable!  There are a lot of larger stones and shapes I haven't used before - exciting!!! I was quite surprised when the package arrived as from the photo I had not appreciated the size of the stones - lovely big bling!!!

First thing to do was to test the coloured ones to see if they would fire. I knew the tanzanite blues and greens would mostly likely discolour in an open shelf firing - but I tried a few anyway! Of course they did!! They went brown, but actually at least one of them went a very beautiful pale cognac colour that I shall use :D

My second test was to fire a few in carbon in an oxygen free atmosphere. They held their colour beautifully - yay!! :) I refired the discoloured ones in the carbon too. The tanzanite ones stayed brown but the green did revert back - good to know!!

So I set about trying out a couple of the rectangular stones.

First I made this ring - I've called it Gothic Green.

To contrast with the lovely deep green stone I set a couple of lab grown rubies, one on each side...


...and I added some lovely little sunburst designs all around the band.


 I was pleased with the result - and as this one fitted me I've given it a test run for a couple of days! It's nice and comfortable to wear!! ;)

For my second try with the stones I made a little pendant with an attached bail. This one has a nice antique look to it. I've called it Clear Sparkle because...well I'm sure you can work that one out!


It's really quite small - and a little different to my usual style I think!


I have lots and lots of stones left to use - so I'll be having fun with these in the future!!!

Joy x


Sunday 22 November 2015

43/52 Mini Moon Flask


One of the first things I made on this year long challenge, it was way back in January, was a moon flask. I've made several more since and I teach making these in my Porcelain Illusions / Joyful Moon Flask workshops. 

I love the shape of these moon flasks and decided to revisit the making of them and have a go at a miniature one! It is all made in silver like the bigger flasks, but I've developed a slightly different technique for making it :D

Each side is enamelled...

...and it has a little stopper so you could use it for perfume. The stopper on this one is set with a 4mm faceted rainbow moonstone cabochon. I think it looks a bit like rock crystal. I chose it because it seems to suit the different colours on each side of the flask. 

 
The round main body of the flask measures just 18mm in diameter. 
 
Here it is with one of its 'big brothers' to give you a better idea of the sense of scale...


...and in my hand. 


Cute isn't it! :D

If you want to make a Moon Flask do get in touch! :) 

Have fun!

Joy x

Friday 20 November 2015

42/52 Modern Medieval Cluster Ring


I'm liking this one - it's slightly too big for me though (maybe I should just make all rings my size in case I want to keep them!). Still, I think I will be making more in this style so next time... ;)

I made one large stone ring earlier in this challenge, but this ring is by far the biggest stone set ring I've ever made!! It is silver and the centre stone is a 6mm amethyst CZ. The surrounding stones are 4mm lab rubies and lab sapphires.
 
Whilst it is large it actually seems to sit quite nicely. I know I could wear it no problem (if it was a smidgen smaller)! In fact I'm wearing it as I type and the stones are super sparkly and catching the light :)


I've called this a Modern Medieval Cluster Ring. I was aiming for a medieval/tudor-ish sort of look - did I succeed?? I used one of my own textures around the ring band and on the back of the stone setting.


I have two more challenge pieces nearly finished so there'll be more posts in the next few days...and part 2 of Japan! :D

Have fun!

Joy

41/52 Textured Spinner Ring

This challenge piece is a spinner ring. Yes, I know I've made spinner rings before in the past but this one is different!! :D

When I've made them before I've used ready made RingCores for the outer channelled ring band, and then created my own unique inner rings. Here is a photo of some of them.


Don't get me wrong, I do think using RingCores is a great idea, but sometimes the sizes they are available in can be a bit restricting, and it doesn't leave any scope for design on the outer ring.
 
Now you know me, I do love my textures, so I decided it was time to start making the outer ring in silver clay as well. This ring is all made using Art Clay Silver, the main metal clay that I use.


I'm very excited with the result and will be making more of these very soon. Now I can have lovely textures on the sides of the ring and make the channelled ring band much more interesting. Also by making my own I've added a nice comfort fit to the ring with smooth rounded edges around the inside of the ring band. The inner band on this ring is set with 2mm lab sapphires. 
 
I made a short video so you can see the ring 'in action'!!! It spins beautifully - in fact better than any of the ones I've made so far!
 
 
This is a new one day workshop I'll be teaching so if you want to make your very own unique ring let me know! :D
 
Have fun!
 
Joy x


Wednesday 18 November 2015

40/52 Japan - Part 1

 Time to catch up on my blog and my annual challenge! 

I have several pieces nearly finished - but first I want to tell you about my amazing trip to Japan!. This is part one - yes there will be a part two very soon! I decided that it was all so wonderful it warranted two entries in my challenge! I hope you agree :)

The flight to Japan is around 12 hours from the UK so by the time I arrived I was already feeling a little weary having not slept on the plane. I had a couple of hours to wait for the bus transfer and I have to say Haneda airport in Tokyo is an excellent place to plane watch! I arrived at my hotel before noon, left my luggage ready to check in later and headed straight out to see some of the surrounding area. The hotel staff told me the easiest way to where I wanted to go was through Ikebukuro railway station - um... it is the second busiest station in the world!  Actually navigating it wasn't too bad, I found my way without getting lost! On returning to the hotel I found they had upgraded me for free - how nice!!! I was on the 22nd floor of the hotel and had a lovely view out across Tokyo - day and night!

Then I headed out again to find the exhibition of all the work from the Silver Accessories Contest 2015. The first surprise was when I saw the poster for the exhibition! Wow - how good is this - very me with all those lovely colours!!!
 
The venue for the exhibition was stunning, and looked great in the dark....

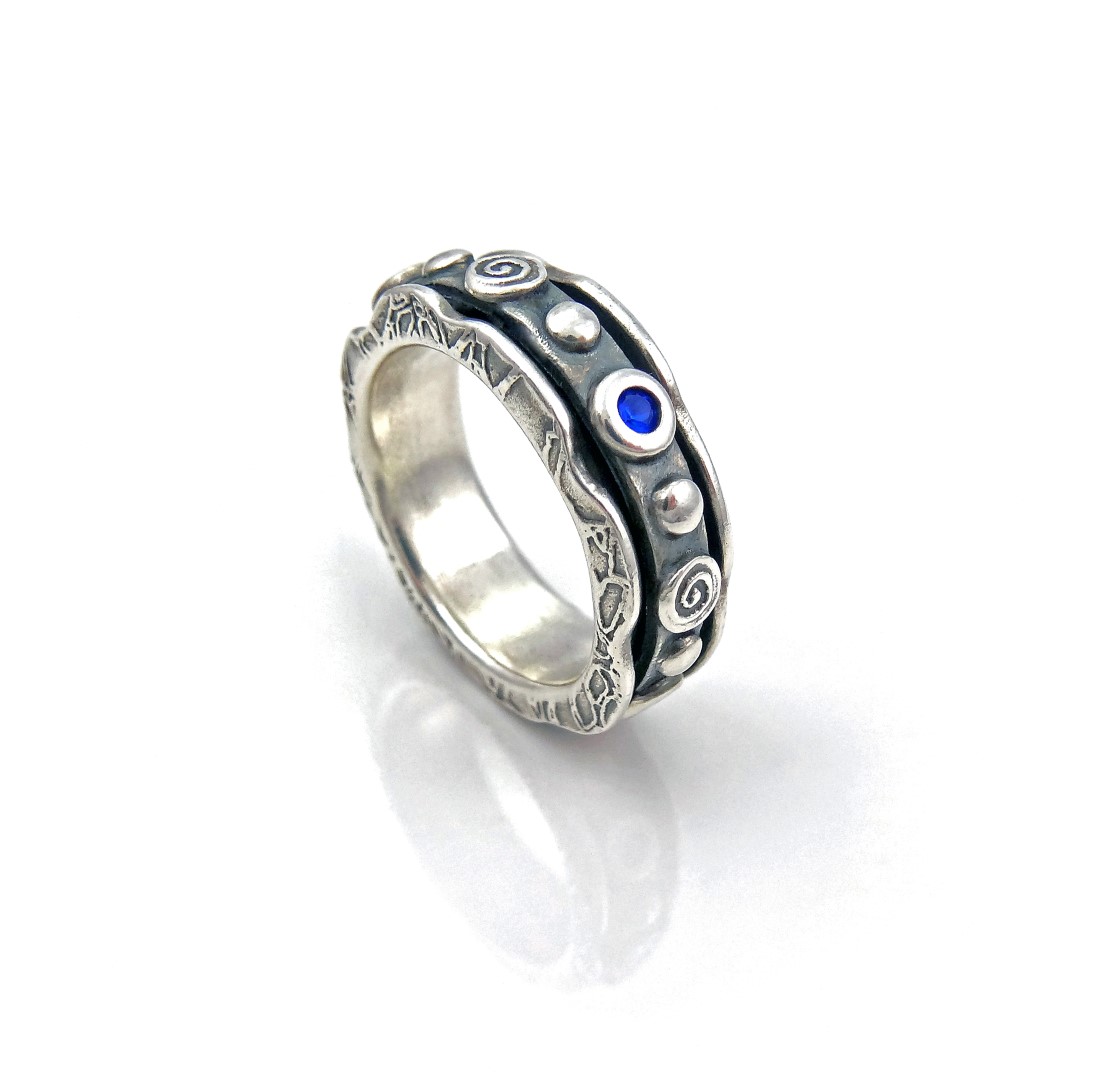
...and  all the entries were wonderful to see. The quality of the work was just amazing and very inspiring!! I really did feel a bit stunned and very honoured that all four judges had chosen my piece for the Grand Prix Award!!

Next day I met up with Dice Minagawa from Aida for a day of sightseeing and shopping! We started off back at the exhibition for another look and a few photos (photography was not allowed in the exhibition so I was very pleased to have these taken for me!). That poster again (of course!) at the entrance to the gallery...

 ...and inside the exhibition by my piece!!! :D


Then we headed off out across Tokyo to go to the jewellery area first. It wasn't long before I had purchased quite a few lovely jewellery tools and supplies (wonderful mini hammers!) and some beautiful turquoise and amethyst beads. 

The fish markets were so colourful. I really didn't fancy the red snapper eyes though which are apparently a delicacy!!!!
After seeing all that fish we had to have a fishy lunch!
Lots of beautiful fresh raw and cooked fish, pickles and rice...and we even cooked our own giant clam on the grill on our table! 
It was a very colourful place and I thought it was quite old, turned out it is a modern chain based on the old fishing village eateries! Oh well :) It looked the part and was very atmospheric!


I found it really interesting how the shops are grouped in areas in Tokyo. After the jewellery supplies  we went to the kitchen supplies area (loads of interesting things there!) and then the road where all the shops sell every kind of food dish you can imagine all made out of wax that all the restaurants use in their windows (it's all incredibly realistic!). We saw shops full of pottery and others selling masks! (Oh yes, more on masks in another post! ;) )
 

 So much to see...
This restaurant specialised in Fugu (puffer fish). Parts of the fish are highly toxic and they must be prepared by licenced chefs only - we didn't try it!
 
Finally we arrived at Asakusa - a large temple complex in Tokyo. My plan was to revisit that area on the Monday to explore further.
When I arrived back at my hotel this coach was parked outside - it seemed to sum up the day perfectly! :D
 

Day 3 was the main reason for my visit to Japan - the Silver Accessories Contest 2015Award Ceremony!

It started off with the official ceremony at 1pm that lasted about an hour. Lots of the award winners were there and it was wonderful as each person went on stage to receive their prize. I was last on and the only one giving a short speech, and I have to say as it drew nearer I started to feel a little bit nervous! When it came to it I think it was all fine though :)

I received my certificate, award and prize...here is Mr Aida reading my certificate before presenting it to me...
...and then I did my speech which Dice translated (no, I didn't have to do it in Japanese!).
 
Next we had the official photos taken, these photos were all taken for me on my camera (thank you Mark!).
 
After that it was time for everyone to enjoy themselves at the reception with a lovely buffet meal. I met lots of delightful people, so many excellent metal clay artists and everyone wearing their fantastic creations as well!

To be continued...!!!

Meanwhile..

Have fun!

Joy x


Related Posts with Thumbnails